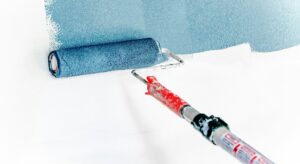


Many people think Interior painting is an easy job, so they take it up as a DIY project. However, It’s not as easy as it seems because you’ve to prepare the place properly. According to Interior painting experts, they have seen multiple people Interior painting their walls, and they usually don’t like the results. This is why they don’t want to do it again.
In simpler words, Interior painting your entire house might be rewarding, but it’s extremely challenging. As a layman, you’ve to understand there are two ways of Interior painting your home: right and wrong. The biggest mistake people make is that they forget about preparation. Proper preparation will make a huge difference.
Ranging from wooden features to trims and walls to furniture, you must fix them before you paint them. It will ensure that the paint coat is fresh and smooth. So, if you want to start this DIY project as well, we are sharing a guide for you!
Interior Painting Checklist to Follow
If you don’t want to start with the interior painting job because you don’t have sufficient information, we recommend hiring Apex Paint Pros. However, if you want to do it on your own, there are multiple steps that you’ve to follow that we have added to the checklist.
- Assess the Home to Find Problematic Areas
If you think that you can pick up a paintbrush and change how your walls look, it will be an absolute disaster. For instance, if you want to make the walls smooth, you have to assess the walls for much-needed repairs. To be precise, you should assess the walls for bumps, holes, and cracks that should be repaired before you apply the paint coat.
It is recommended that you write down all the materials that you need to repair these issues. It is better to create a checklist of how and what you need to do.
- Cover the Floor & Move Furniture
Before you start the repair to ensure smooth paint, you should move the furniture. You should move it away from the walls and make sure the floor is covered. You should use a plastic tarp to cover the floor as well as furniture pieces. Covering everything will help clean up everything easily once you are done with painting. Also, you won’t have to worry about splattering the paint here and there.
The ideal option is to use flooring paper. In addition, you should use tape to make sure the flooring paper sticks to the surface. It will ensure that you don’t end up painting the furniture or hardwood floors.
- Repair the Walls
After carefully looking at your walls to see what needs fixing, you should fix them right away. You shouldn’t skip this step because putting it off will cost you more money in the long run. If you don’t fix any cracks or holes, they will be visible even after Interior painting.
We recommend using Spackle to fix the holes and cracks. You can use it for nail holes because it becomes clear once everything is dry. On the contrary, you will need to use drywall patch and joint cement for bigger holes.
If your wall has holes, cracks, or other uneven areas, you should fix them before Interior painting. This will give your wall a clean and expert look. If there are some rough spots, just sand them to make sure the paint applies smoothly.
- Clean the Walls Properly
It’s a good idea to clean your walls if they are really dirty. A sponge and warm water are all you need to clean your walls. This will be enough to remove stains left behind by grease and oil. However, if there are some tough spots, we recommend using fine-grit sandpaper. This won’t be necessary in every case but do clean the walls if there is visible dirt and dust.
If you use water and soap to clean the walls, make sure you dry them properly. That’s because the paint won’t remain in place if the walls are wet. So, let them dry before applying the paint.
- Sand the Surface to Make It Smooth
To make sure the boards, trim, or cabinets are ready to paint, you will need to sand them down. As far as the sandpaper is concerned, it depends on the paint finish you want.
- Use Primer
In some cases, you might have to use a primer before Interior painting an indoor wall. This is required only if the wall is porous or if you’re going from a very dark color to a light color. Before you paint, the primer will help cover up the old, dark color. We suggest that you use high-quality paint when you paint the walls inside your home. This will protect you better and last longer.
- Take off The Switches and Plug Plates
Take off all of the plugs and switch plates. You should also put painter’s tape over the rest of the parts so that you don’t paint them by accident. Put the parts that you took off in one bag. This will make it easier to install them again.
- Remove the Painter’s Tape
If you’re going to paint your walls different colors, make sure you tape off all the trim and the joints where the walls meet. A smooth finish and clear lines will come from covering up places you don’t want the paint to go.
The Bottom Line
The bottom line is that Interior painting your home on your own can be difficult. This is likely to happen if you don’t have any experience. Following the checklist from this article will help you paint the home to perfection. However, if you need help with Interior painting, we recommend connecting with Apex Paint Pros to ensure your walls are smooth. So, will you hire a professional or paint on your own?